Time to time musings about backyard garden pond building, keeping, troubleshooting. Questions and answers from pond keepers and builders. Occasional excerpts from the pondlady's book, "A Practical Guide to Building and Maintaining your Pond."
Monday, November 13, 2006
Formal ponds
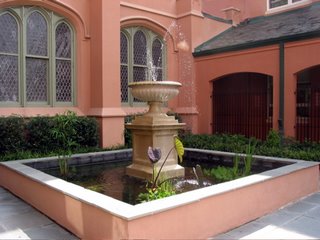
This is a huge formal pond in a courtyard of Trinity Episcopal Church in New Orleans. I did not build it but took care of it for years. One of the particular problems with this pond was the lime leaching out of the concrete. It was improperly sealed and the pot at the top had so much lime in it, there were calcium deposits on it that had to be removed yearly. It looked like it had the chicken pox. Since the pond was always planted and in use for ceremonies, I could not have it emptied and sealed although that would have been the best way to deal with the problems. I hauled a gallon of vinegar with me and poured it in the water weekly. That kept the plants alive and looking great. Of course the courtyard always smelled like a Caesar Salad.
Sunday, November 12, 2006
planting the rest of the garden
Friday, November 10, 2006
Pond water layers in winter
In the cold of winter, you will notice your fish stay near the bottom of the pond. Why? Because the water is warmer and denser there. As temperatures fall, the water forms layers of water with the warmest layer at the bottom. With each temperature drop, a new colder layer is formed, but the bottom layer stays warmest.
The layering of the water helps the fish stay healthy, helps them absorb oxygen.
All of this assumes your pond is built below your frost line: That's the depth your soil or water freezes solid.
So do not keep your pumps running during the winter. It can kill your fish.
The layering of the water helps the fish stay healthy, helps them absorb oxygen.
All of this assumes your pond is built below your frost line: That's the depth your soil or water freezes solid.
So do not keep your pumps running during the winter. It can kill your fish.
Thursday, November 09, 2006
bamboo and bananas
Down here in the subtropics of New Orleans, we love to plant banana trees and we love to plant bamboo. There are red dwarf bananas, medium sized bananas and the huge ones that produce fruits you can pick and eat. Each and every one of them is invasive and you will soon have banana trees sprouting all over your yard and your neighbor's. If you plant bananas close enough to your pond, they will sprout up through your liner. I have seen them come up through 45 mil EPDM liner, so beware of bananas.
Bamboo comes in hundreds of different kinds and is beautiful. We love bamboo as much as we love banana trees. There are clumping and non clumping kinds of bamboo. Each is invasive. The difference is that the non clumping kinds will take a little longer to send a shoot up through your liner. And bamboo is much harder to get out of your yard, neighbors yard and for that matter, your neighborhood, than bananas. Bamboo is persistent and must be watched daily for new shoots and that's hard to do when the only way you can see a new shoot is when it has popped its little head through your brand new liner. The way to contain bamboo is to surround the plant with metal that is three feet deep and completely surrounds the root system. That's a mighty deep hole to dig.
So CAUTION! Do not plant either of these plants near your pond or you might be patching your liner.
Tuesday, November 07, 2006
The Sacred Pond
This is the largest pond I ever built. It is on the grounds of American Aquatic Gardens in New Orleans and is now called "The Sacred Pond." It has changed over the 15 years it has been there. The planting is huge now and has changed the look of the watefall. The pond and most of the plants survived Katrina.
Monday, November 06, 2006
Baby Goldfish in Winter
Generally speaking, baby fish will survive a winter in the pond if they are an 1 1/2 inches long or longer. Most of the time they are still blackish, grayish, brown, so you can't find them if you are trying to catch them to bring inside. Next spring they will be orange and you will think they magically appeared during the winter.
Just make sure there is a hole in the ice so toxic gases can escape and oxygen can get in.
Sunday, November 05, 2006
Building a rain garden
What on earth is a rain garden? It's a garden supported completely by rain. It can be nothing more than a garden of native plants in a shallow low spot in your garden, or it can be huge terraced areas in cities to catch and retain storm water rather than sending it straight down a storm drain to pollute our drinking water even more.
Use rain water to top off your pond after filtering it through gardens in the yard.
Oh, and a rain garden makes a great addition to the beauty of your garden.
Use rain water to top off your pond after filtering it through gardens in the yard.
Oh, and a rain garden makes a great addition to the beauty of your garden.
Saturday, November 04, 2006
Birds need a drink
Turtles sunning themselves in the Big Branch Wildlife Reserve in Lacombe, Louisiana.
Another great way to give birds a drink in the winter is to pound a nail in the bottom of a bucket or pail. Put a small rope or short piece of cotton in the hole to act as a wick. Fill the bucket up with water and hang it over a tree branch. You might want to hang the bucket up first before you fill it with water. Fill the bucket daily.
Friday, November 03, 2006
Ponds, birds, butterflies
As soon as water is in your pond, you will start noticing birds, butterflies and dragonflies arriving to check out the new resort in the neighborhood. Dragonflies are usually first and will be buzzing your head as you build the waterfall. When you begin planting in and around your pond, the butterflies arrive. Give birds a special place to have a bath and a drink. Make one end of the pond very shallow, about 3 to 5" deep and turn it into a bog garden. You can put rocks there for bird perching and maybe some smaller pebbles for tiny bird feet to stand on while bathing or drinking. If you put plants in the pebbles, your bird resort and pond garden will also act as a filter for your pond. The birds will flock (pardon the pun) to your yard. If you put feed out in the winter, you will make your feathered guests even happier. Make sure the bog area does not freeze. You can do this by using a de-icer.
Thursday, November 02, 2006
swamp photos
Tuesday, October 31, 2006
More pond questions
Is it ok to leave the water fall on during the winter MOS.? My husband thinks that if it freezes, the rocks around the fall will break, I'm pretty sure that we left on last winter and it did ok.
Pond lady sez:
It can be dangerous in many ways to leave the waterfall running. The pump churns up warm water from the bottom and the fish are hibernating there. That can kill your fish.
If you have any ice/freezing, you can greatly shorten the life of your pump.
Reply from yesterday's questioner re water level dropping:
Found the leak. It's behind the water fall, can't get to it. Know we'll have to wait until the Spring, I'll just keep adding water to it.
Thank You
Monday, October 30, 2006
Pond Questions
Hello,
Got a question, my skimmer box keeps emptying out by itself. Is it supposed to do that?, I have noticed that lately. It never did that before, until after I cleaned the pond back in June.
Thank you.
Pondlady sez:
First of all, turn off the pump, fill up the pond and let it sit for a day. If the water stays at the same level, you have water escaping somewhere.
Turn the pump back on. Check to see if there is a tiny dripping off the waterfall. You are losing water somewhere and that's the most likely place.
Maybe your pond has settled and the water is going over the side? This does happen over the years.
Or you could have a small liner leak....very rare, but possible.
To find out what is happening, either remove the pump from the skimmer box and put it in the pond. Run it without water going through the skimmer. If it works without losing water that way, you probably have a leak in the seal where your skimmer is attached to your liner. That happens often.
If you don't want to remove the pump from the skimmer, use another pump in the pond. Turn the one in the skimmer off and run the other one. If you don't lose water, you know the problem is with the skimmer.
Sunday, October 29, 2006
Using Pots in the Garden
Saturday, October 28, 2006
Overwintering Tropical Water lilies
To those of us who live in the Southern part of the US, winter rarely arrives and overwintering water lilies is far from our thoughts this early in the year. Even when we do think of it our choices are two: Hope that we do not have a hard freeze and most of the time we don't, or even if we do, chances are it will not last long enough that the tropical water lilies will be lost. And even if they are, chances are a neighbor's won't be, so we can get a start. I know, I know, we are lucky, BUT you are not having to wonder how you will make it through one more day of the intense heat that August heaps on us, while knowing that September is just another name for August and October is more of the same.
So to you who have to concern yourselves with freezing weather, here are some tips for overwintering those expensive tropical lilies.
First of all stop feeding them about 6 weeks before the first frost. You have already stopped, right? Even here in New Orleans, I recommend ceasing feeding in October so the lilies will be dormant for the colder months. If we continue to feed them, chances are we will lose them even in a mild freeze because the tender new growth will be damaged.
One way to overwinter lilies is to drop the pot to the deepest part of the pond, remove the leaves and just forget them until spring. In the spring, remove them from the pond. If the corms are mushy throw them away. There should be many corms in the pot, so you will not lose your lily. Just pot up non mushy corms. Pot them up, put them back in the water and start feeding when the leaves reach the top of the water.
This method works about half of the time.
As the days shorten and the weather cools, the leaves will become smaller and smaller, turn yellow and die. When the leaves are gone or almost gone, remove it from the pond. Take it out of its pot and rinse off the soil. There will be tubers all through the soil, among and beneath the roots. They will be about the size of walnuts, hard and dark brown. If they are mushy discard them. Cut or break them apart...usually you can do this with your fingers, and put them in a warm place to dry. Let the dry for a few days.
Then get some play sand or builder's sand, dampen it and fill a resealable plastic bag with sand about halfway. Put the corm in and fill the bag the rest of the way. One corm per bag, please. If you label the bags, you will remember what they are. Seal them and store in a cool, dark place where the temperatures are between 50 and 55 degrees. When spring arrives, pot them up and feed when the leaves reach the top of the water.
This method will work about half the time.
The surest way to overwinter water liles is to buy hardy varieties. Their flowers do not shoot above the water like the tropicals and the colors will not be quite as dramatic, but they will overwinter anywhere.
Friday, October 27, 2006
Planting in SW Florida
A guest writer today, Michael Spencer ASLA, MSA Design, Inc
Regarding plant material that works in SW Florida, there are several good sources of information. Don't ever buy materials from Home Depot/ Lowes unless you know the material; while I frequently buy new plants there, I am careful about the natural ranges. These stores buy in bulk for the Southern part of the state, and material that works in Orlando [Azaleas, for example] will not work in Naples.
The best thing by far is to develop a relationship with a knowledgeable local person. This can be a neighbor or even a sales person at Lowe's, if you find the right one.
There are also books at Barnes and Noble that can help. Look for books by Pamela Crawford, Robert Haehle, or Gil Nelson.
There is also daves garden.com
for some advice, but again screen the advice.
By far the most important thing is to understand your soil conditions and amend as needed. Really. Don't waste money on plants until you have tested the soil; this is free at the Extension offices in Collier, Lee, and every other county in the country. We have an alkaline soil, mostly, that is very low in organic matter. You should amend the soil to 18" deep in the areas around the pond where you want rich plantings. Don't skimp on this. Period.
Don't make the mistake of thinking that if it is native it just works. This is not true, especially in the kinds of visual gardens that we want around our homes and around our pools.
DO prepare a plan. You need this before you buy your materials. When you do your planting plan, you do NOT need to know the plants you want to use [yet]. You draw your plant and you indicate where you need bed lines, where you want a small plant with blue flowers, where you want a big juicy tropical plant, etc; in short, a conceptual plan helps you frame the design. Then you can look for specific materials that match your concepts. Perhaps you want to use Philodendron, or Alpinia, as your tropical accent, for example. Once you start naming plants, the choices for adjacent plants can be made in terms of size or color or textural contrast. It starts to fit together like a glove. After you know your materials you can shop for the best prices.
Do not think about planting without irrigation in southwest Florida. And do not think that an irrigation system is necessarily 'anti-xeric'; it is assuredly not. A properly design irrigation system will give you a rich garden with the minimum amount of water usage.
Be aware of micro-climates and sun patterns. Our sun here is brutal beyond belief so be sure you understand it.
Thursday, October 26, 2006
Newstead Abbey pond
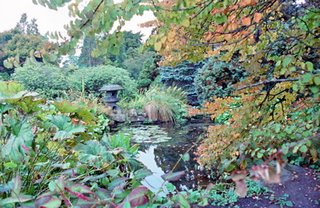
The gardens at Newstead Abbey in England, where Byron wrote are some 400 years old and incredibly beautiful even in October when this picture was taken. The ponds and streams were incorporated into the garden seamlessly. In America, we only began taking our ponds seriously within the past 25 years. I think that the idea of ponds for decoration started in China about 700 AD when emperors began keeping goldfish as pets. Now we can all have as many goldfish as we wish, royal or not. And if we continue to garden, ours will become 400 years of beauty as well.
Wednesday, October 25, 2006
Decorating the pond
Have you ever thought about decorating your pond for the holidays. You can put a cinder block that you have spray painted black in the water and put a scarecrow or a witch or a pumpkin on it. You could change the decorations for each upcoming holiday. Use rope lights in the plantings around your pond.
Tuesday, October 24, 2006
Pond spitters
The spitter in the pond is a great way to get water sound with a small pump, thus saving electricity costs. The small pump used to power the spitter uses much less than the larger waterfall pump. The downside is that a wind can blow the water out of the pond and your pump can be dry in a couple of hours. If there is a strong wind blowing, just unplug your pump.
Monday, October 23, 2006
To build a waterfall
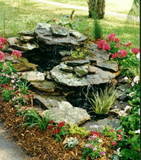
Yesterday I spoke of building two separate ponds rather than try to build a multi-level pond. This picture is an example of a multi-level pond, not separate ponds. I had a hill to build on, which is uncommon in South Louisiana, so I could easily make different waterfall levels. But I did find with these falls, about 10' tall altogether, that to make a dramatic sound, I had to use a separate pump in each level pumping water up to the next level and back down in the same never ending circle we are used to.
By the way, I had to stand on one group of rock to build the higher one. You know I had to have confidence in my building abilities.
Sunday, October 22, 2006
Two level pond
We had a small space to work in, very small. In order to add interest to our small space, we built a two level pond. But look closely. It is not two levels, it is two separate ponds, each with its own pump and tiny waterfall. Two level ponds are difficult to build as each pond must hold water at exactly the same level. When you lower one spot, even a little, you may be able to see liner. If the two level pond is not done exactly right, the bottom can pump the top dry, water will spill over the bottom and you can have a real mess on your hands. If you are inexperienced in pond building, do two separate ponds and no one will ever know.
Subscribe to:
Posts (Atom)